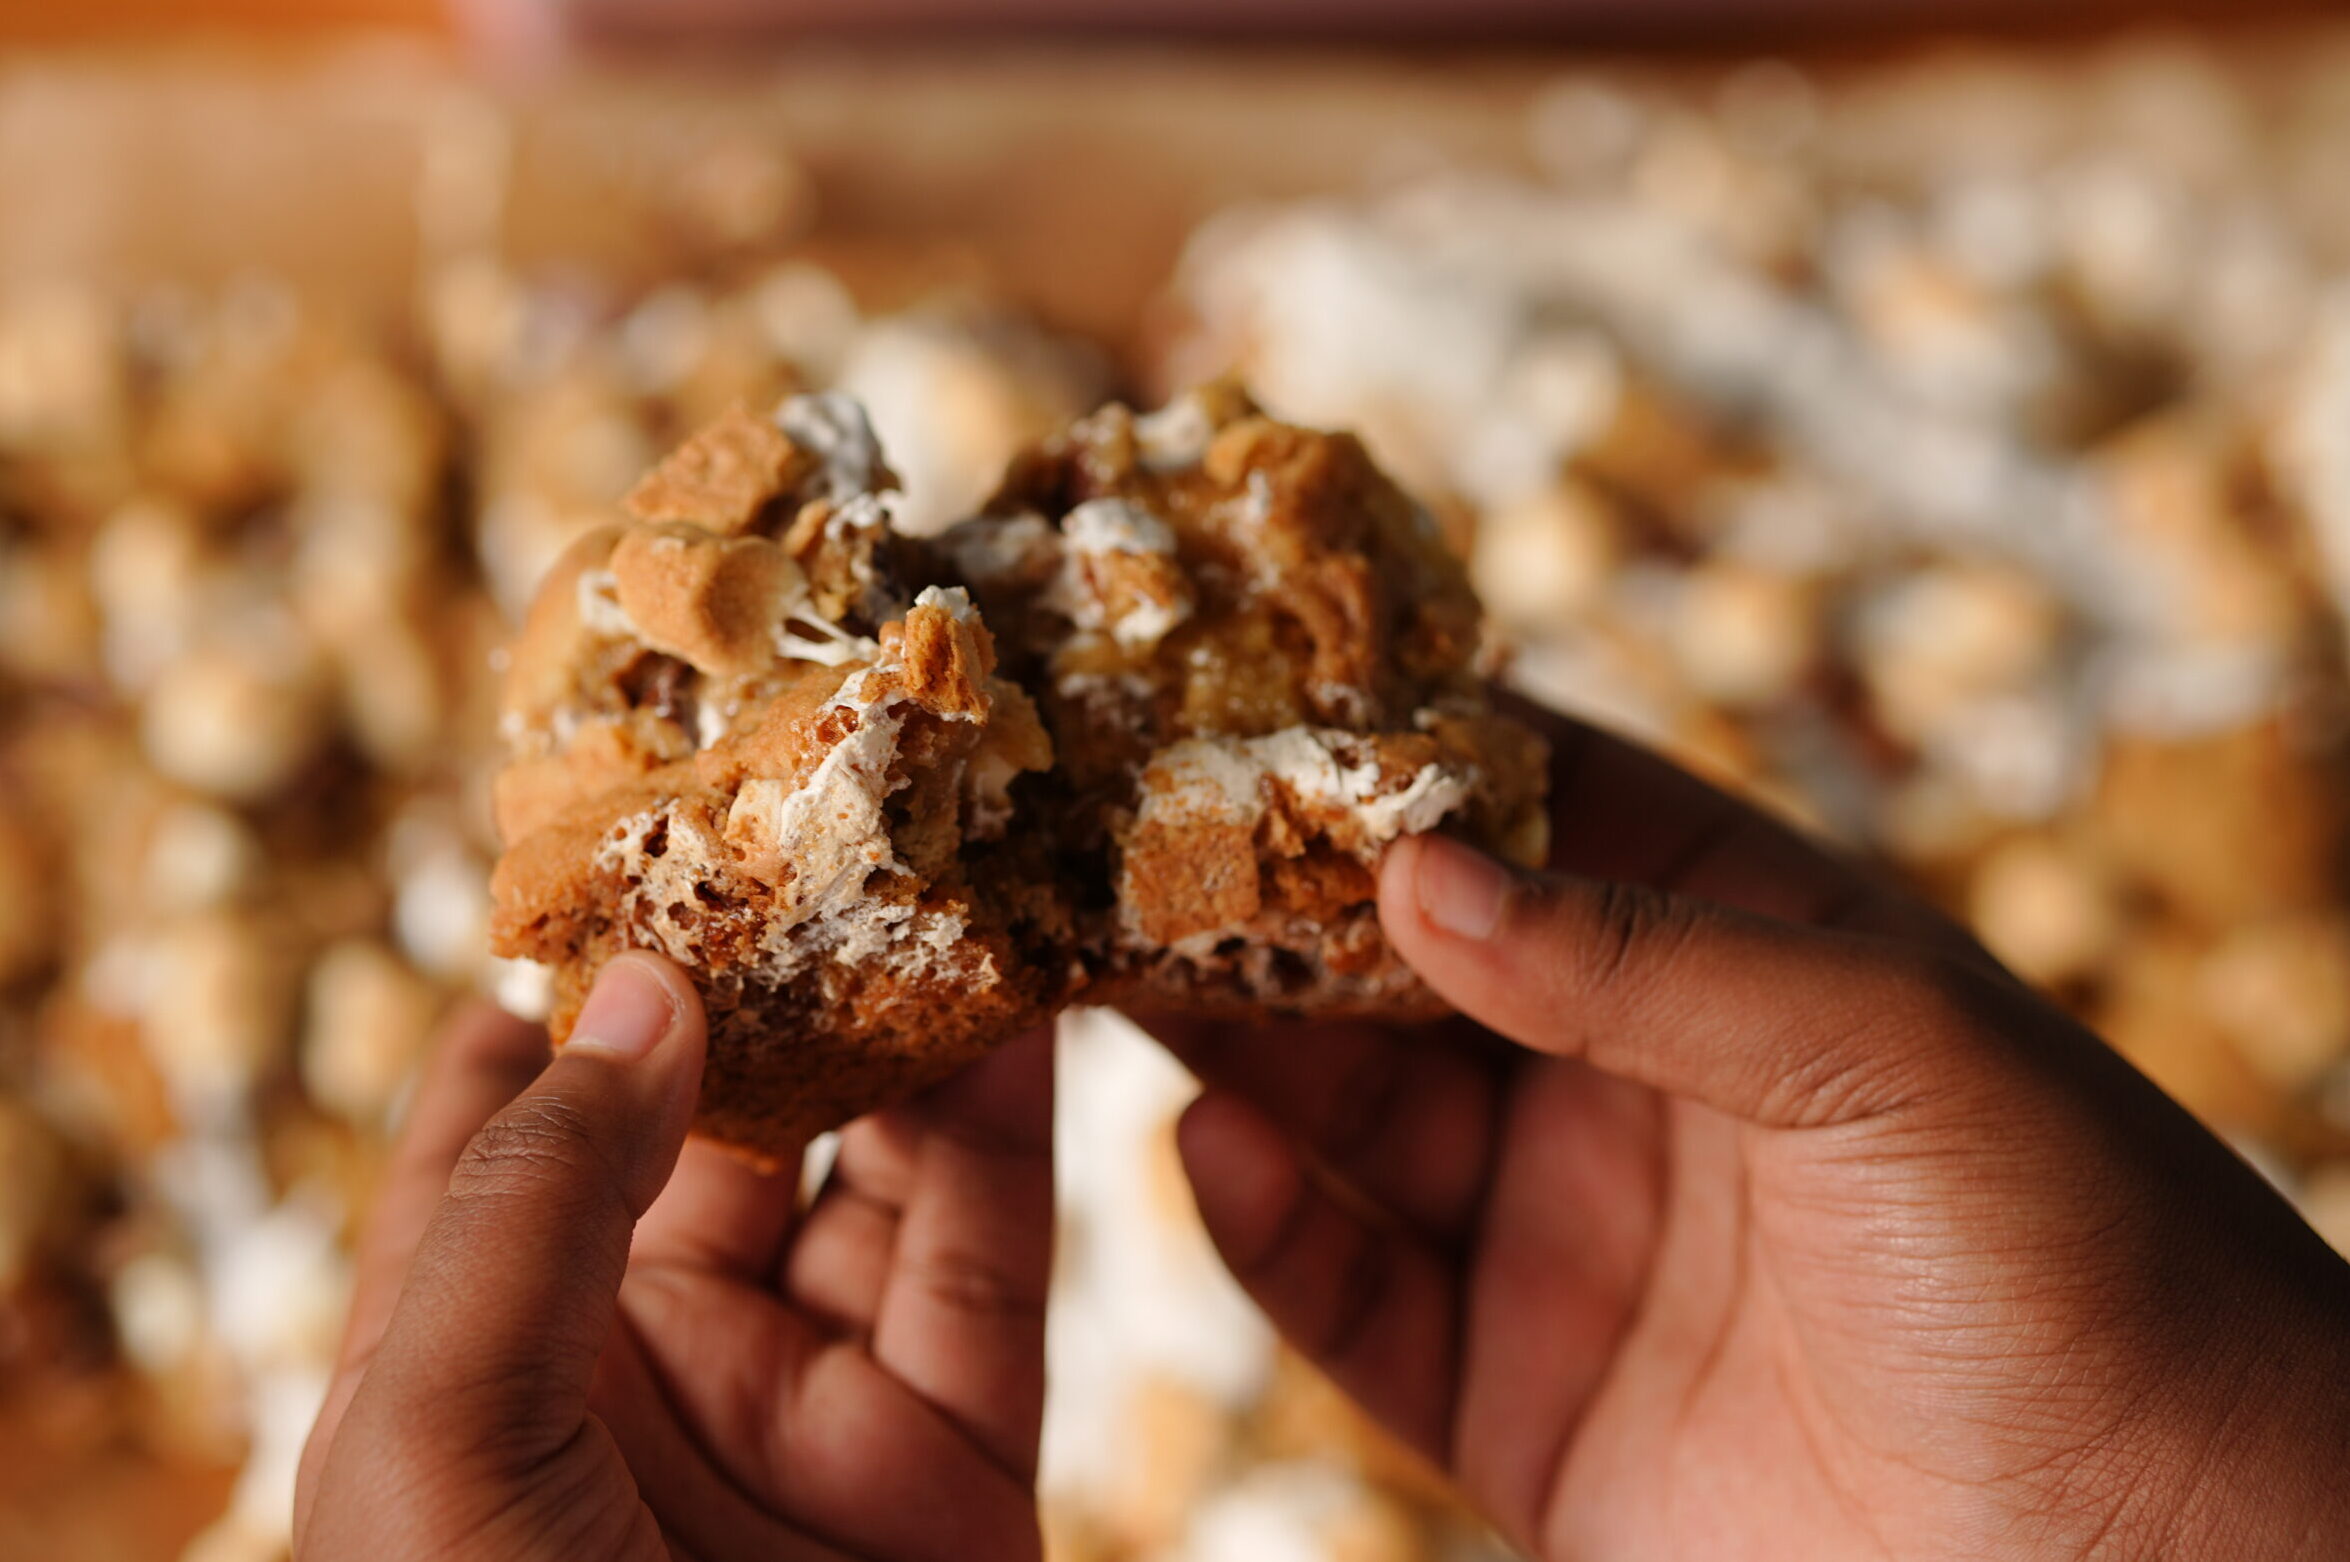
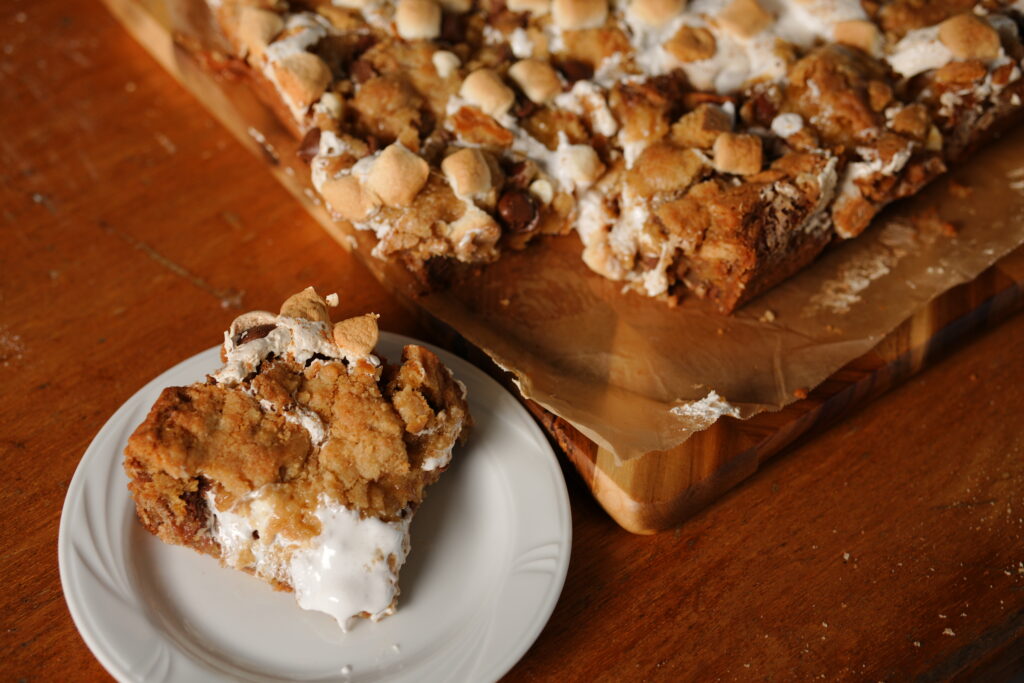
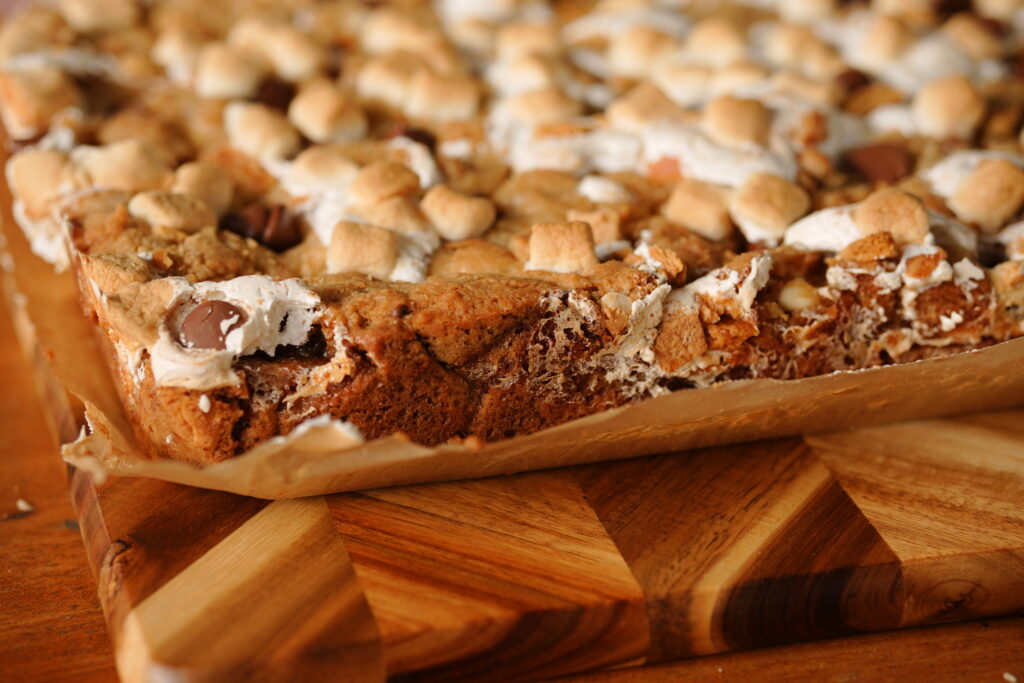
If you love classic campfire s’mores but want an easy, mess-free way to enjoy them at home, these S’mores Cookie Bars are going to be your new obsession. Imagine chewy cookie dough packed with chocolate chips, layered with graham crackers, gooey marshmallow fluff, and melty milk chocolate—all baked into golden perfection. They’re the ultimate dessert mashup: part cookie, part s’more, and 100% irresistible.
Whether you’re baking for a family night, a party, or just a cozy weekend treat, this recipe delivers all the nostalgic flavors of s’mores in a fun, shareable bar.
Everything You Need to Make S’mores Cookie Bars
This recipe is fun and indulgent, but having the right tools and quality ingredients makes all the difference. Here’s everything you’ll need to make these gooey, golden bars come out perfectly every time:
🛠 Tools You’ll Need
Mixing Bowls
For combining wet and dry ingredients separately before bringing them together.
This set is beautiful and practical. With three generous sizes (46 oz, 80 oz, and 140 oz), I use the smallest for dry ingredients, the medium for wet, and the largest when doubling the recipe or tossing a big salad.
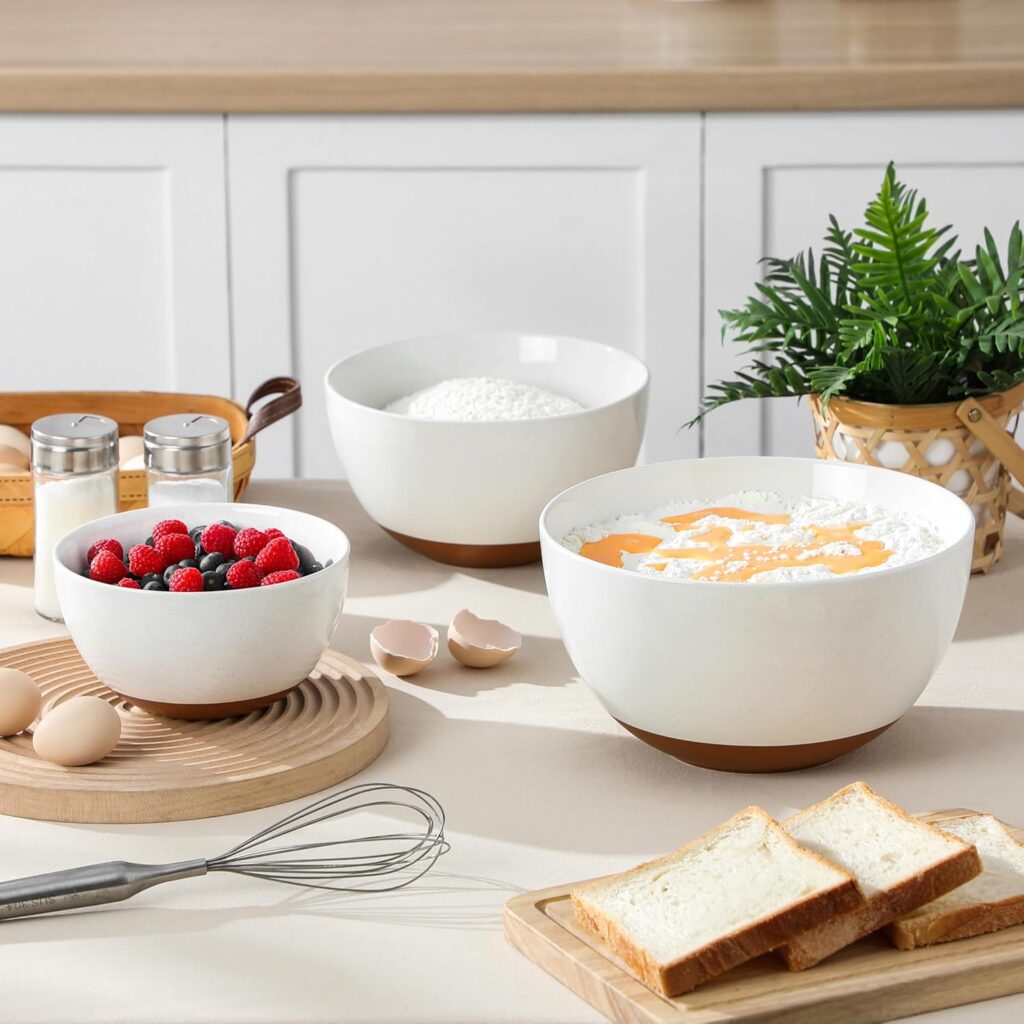
They’re:
- Oven-, microwave-, and dishwasher-safe
- Durable and chip-resistant
- Designed to nest for easy cabinet storage
Whether you’re mixing batters or serving meals, these bowls work hard and look great on the counter.
Measuring Cups + Spoons Set
This set is as practical as it is beautiful. With 9 essential pieces (4 measuring cups and 5 spoons), you’ll have everything you need to measure flour, sugar, spices, liquids, and even coffee with confidence.
They’re:
- Engraved with U.S. & metric units for accurate measurements
- Stackable for easy storage in tight kitchen spaces
- Made of food-grade stainless steel with a durable, rust-resistant gold finish
- Dishwasher-safe and easy to clean
- Stylish enough to display on your counter while still tough enough for daily use

13″ x 9″ Baking Pan
The perfect size for layering graham crackers, marshmallow fluff, and cookie dough evenly. This pan is as stylish as it is functional. With its pink exterior and gold nonstick interior, it’s designed to make baking effortless while looking gorgeous on your counter.
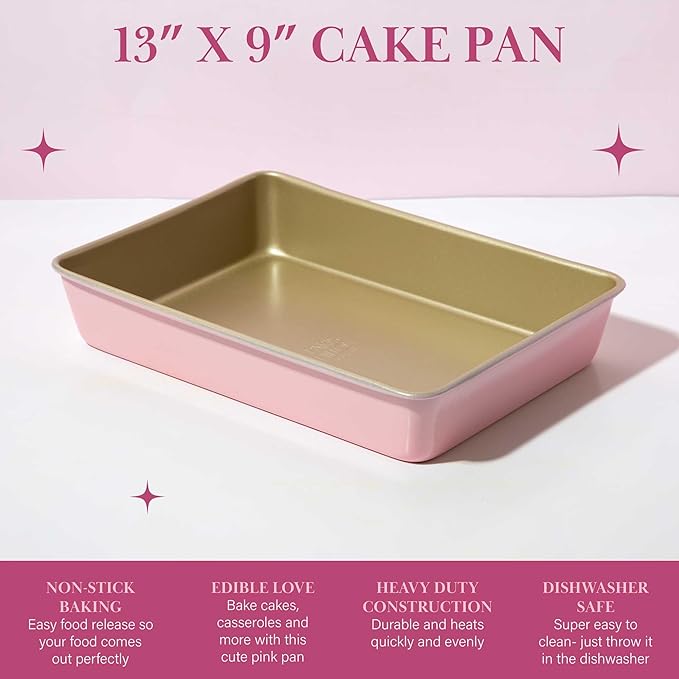
They’re:
- Nonstick & Easy Release – Your bars, brownies, and casseroles come out clean every time.
- Heavy Duty Construction – Built to last with quick, even heating.
- Dishwasher Safe – Cleanup is a breeze—just pop it in the dishwasher.
- Chic & Functional – The pink and gold design adds a fun, stylish touch to your bakeware collection.
Get the Paris Hilton 13×9 Cake Pan on Amazon (affiliate link).
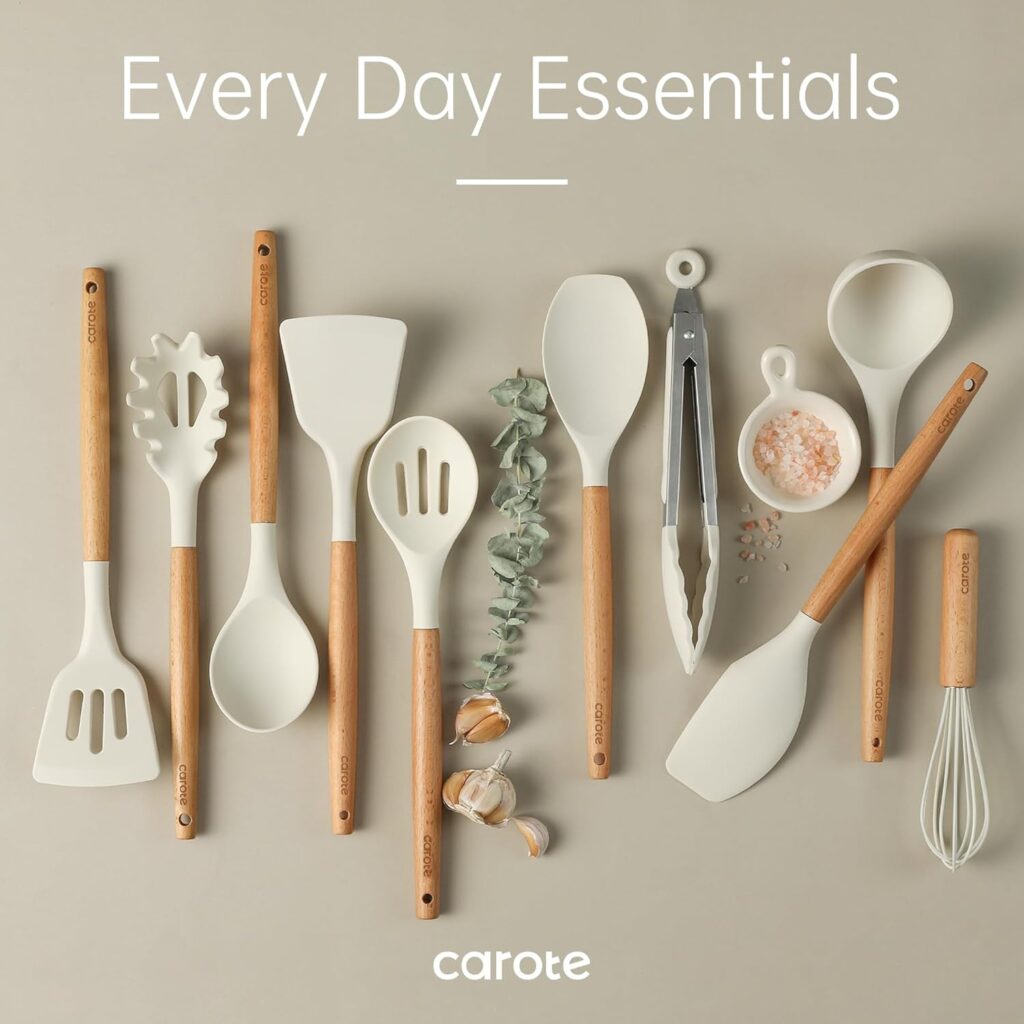
Baking Utensils – Spatula
Cooking is so much easier when you have the right tools—and this 10-piece silicone utensil set has everything you need. With smooth wooden handles and durable silicone heads, these utensils are as chic as they are practical. The spatula helps spread the dough and marshmallow fluff without sticking.
They’re:
- Food-Grade & BPA-Free – Safe for everyday cooking without toxins.
- Heat Resistant up to 446°F
- Nonstick Safe – Protect your pots and pans from scratches.
- Easy to Clean – Simply rinse with mild soap and water.
- Complete Set – Includes spatulas, spoons, ladle, pasta spoon, tongs, and whisk for all your kitchen needs.
- Beautifully Designed
Get the CAROTE Silicone Cooking Utensils Set on Amazon (affiliate link).
🍫 Cookie Dough Base
- Dark Brown Sugar + White Sugar – The combo gives sweetness with a touch of caramel flavor.
- Butter – Provides richness and moisture to keep the dough soft.
- Eggs – Bind the dough for structure.
- Milk + Vanilla Extract – Adds creaminess and warmth of flavor. Watkins Vanilla Extract is my go-to.
- Flour, Cornstarch, Baking Soda, Baking Powder, Salt, Cinnamon – The dry base that keeps the bars chewy and flavorful. (I recommend Argo Cornstarch.)
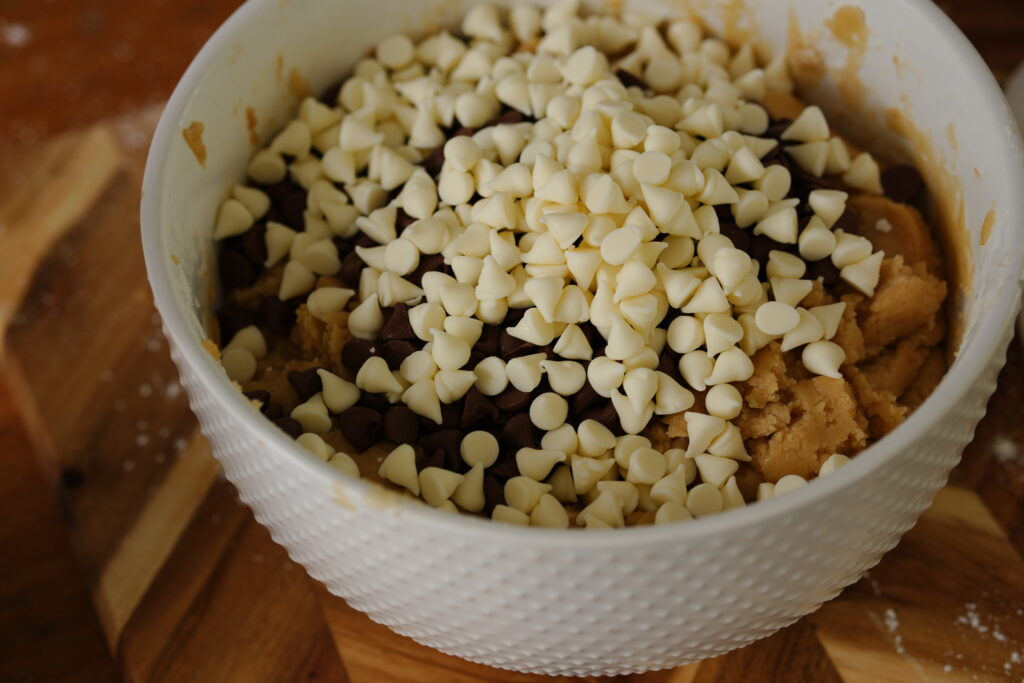
- Chocolate Chips – I used half milk chocolate chips and half white chocolate chips for variety.
🔥 S’mores Layers
- Graham Crackers – Form the base and add crunch.
- Marshmallow Fluff or Jumbo Marshmallows – The gooey layer that makes these bars irresistible.
- Milk Chocolate Bar – For that classic campfire s’mores flavor.
💡 Pro Tips
- Use parchment paper to line your baking pan for easy removal and clean-up.
- Press half the dough into the bottom of the pan, layer with fluff, crackers, and chocolate, then top with the remaining dough for the best texture.
Let the bars cool before slicing so they set properly.
Ingredients for S’mores Cookie Bars
Here’s everything you’ll need to make these gooey, bakery-style bars at home:
For the Cookie Dough:
- 1 ½ cups dark brown sugar
- ½ cup white sugar
- 1 cup melted butter
- 2 large eggs
- 2 tsp pure vanilla extract (I recommend Watkins Vanilla Extract)
- 2 tbsp milk (any variety works)
- 3 cups all-purpose flour
- ¾ tsp salt
- ¾ tsp baking soda
- ½ tsp baking powder
- 1 tsp cornstarch (I use Argo Cornstarch)
- ¼ tsp cinnamon (add ½ tsp for extra flavor!)
- 1–2 cups chocolate chips (milk, semi-sweet, or a mix)
For the Layers:
- Graham crackers (about 1 sleeve)
- 1 jar marshmallow fluff or marshmallow creme
- Mini marshmallows for topping (or swap with jumbo marshmallows, 1 per bar)
- Hershey’s “mini kisses” are classic, but any brand of chocolate chips works)
✨ Note: I love using half milk chocolate chips and half white chocolate chips for extra flavor and contrast. You can mix and match your favorites to really make this recipe your own!
Watch How I Made These S’mores Cookie Bars
How to Make S’mores Cookie Bars (Step-by-Step)
Prep: 15 minutes • Bake: 25–32 minutes • Pan: 13×9 (lined with parchment and lightly greased)
Step 1: Preheat & prep the pan
Heat oven to 350°F (175°C). Line a 13×9 pan with parchment, leaving overhang for easy lifting. Lightly grease.
Step 2: Mix the wet ingredients
In a large bowl, beat melted butter, dark brown sugar, and white sugar until smooth and glossy (about 1–2 minutes).
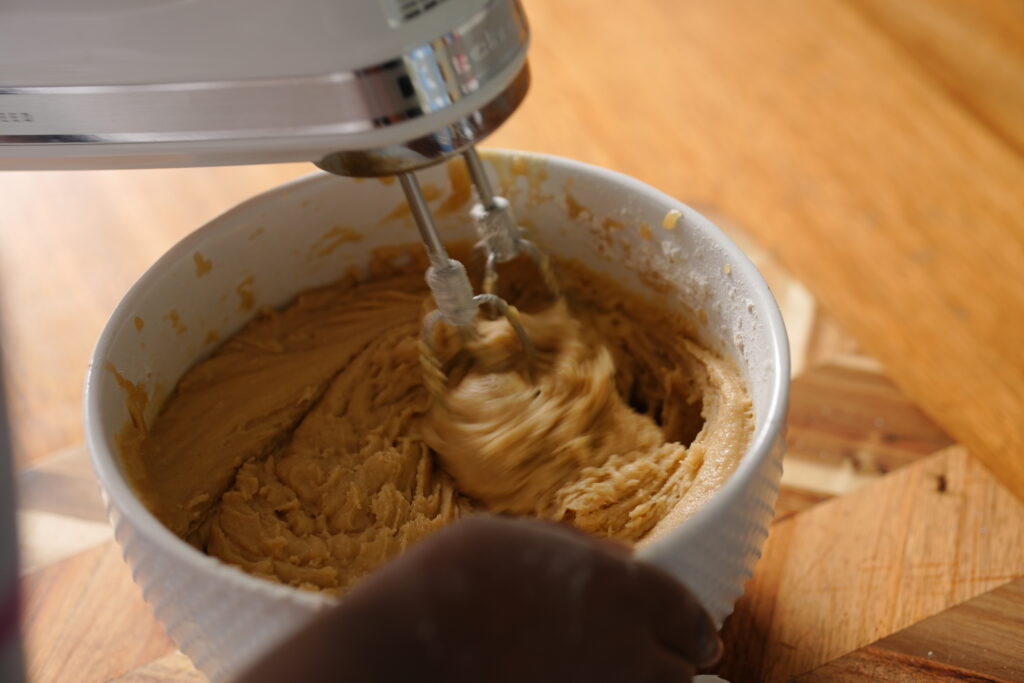
Step 3: Add eggs, vanilla & milk
Beat in eggs, vanilla extract, and milk until fully combined.
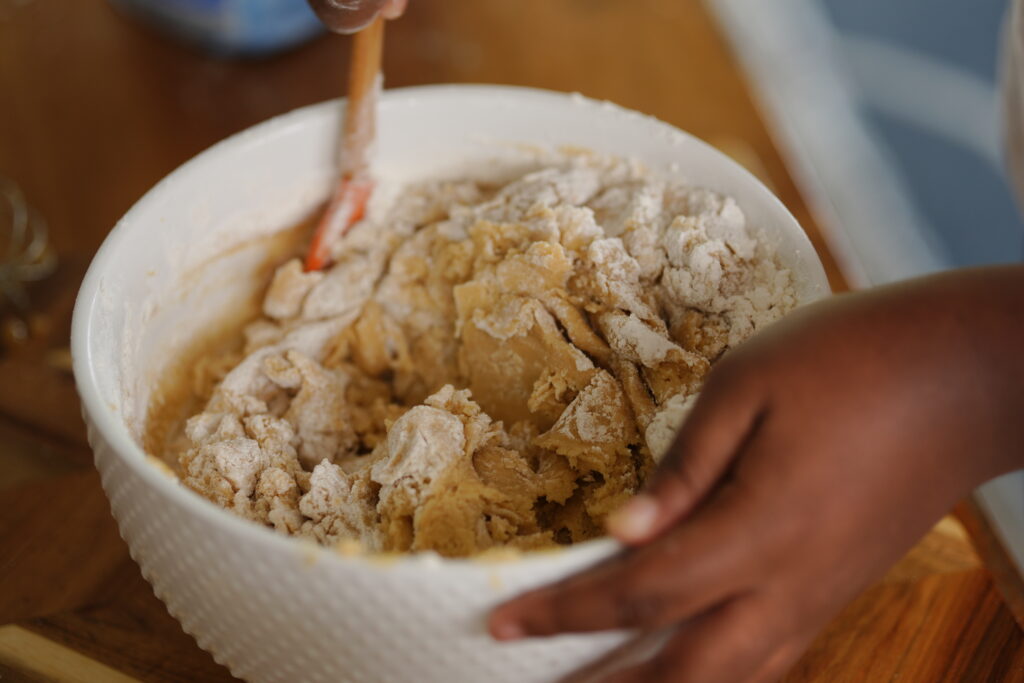
Step 4: Combine dry ingredients
In a separate bowl whisk flour, salt, baking soda, baking powder, cornstarch, and cinnamon. Add to the wet mixture and mix on low just until a soft dough forms—don’t overmix.
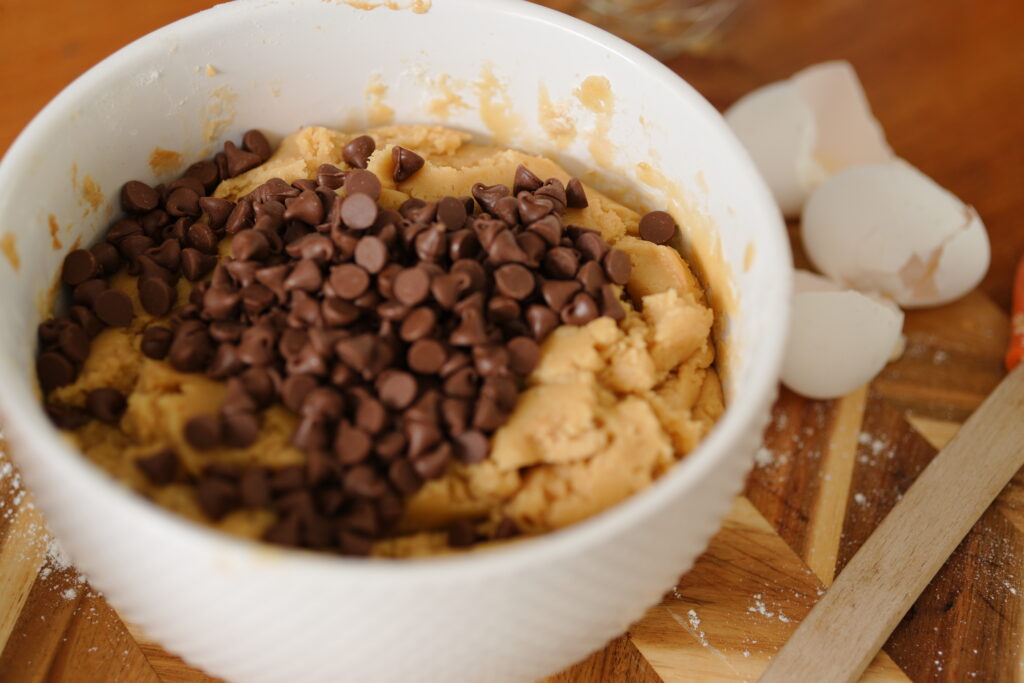
Step 5: Fold in chips
Fold in 1–2 cups chocolate chips. I like half milk/semi-sweet and half white chocolate chips for extra pockets of melty goodness.
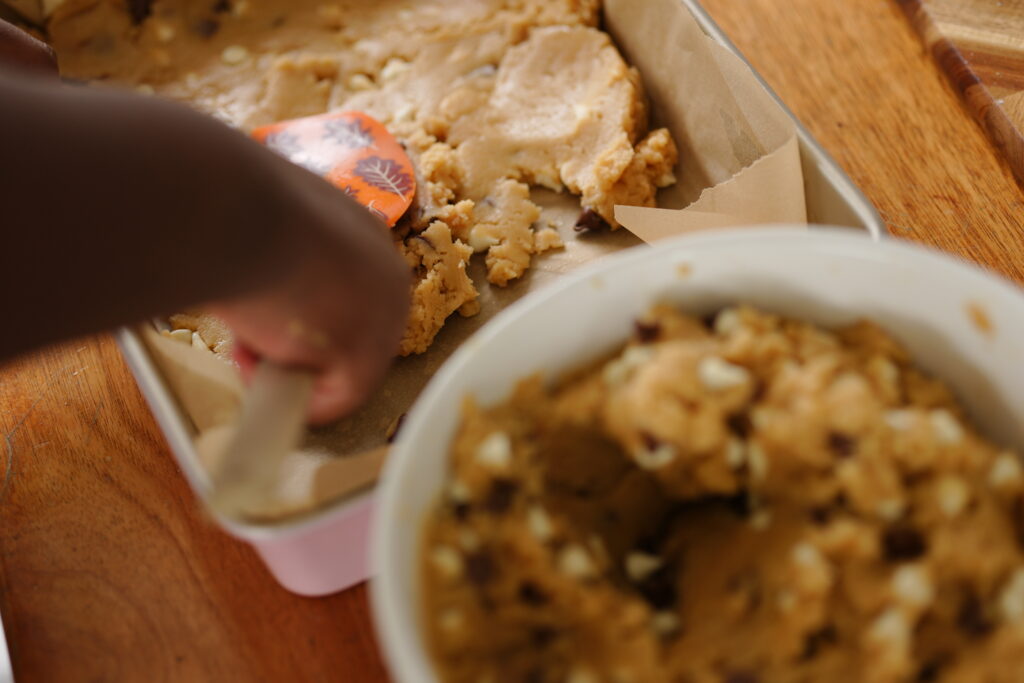
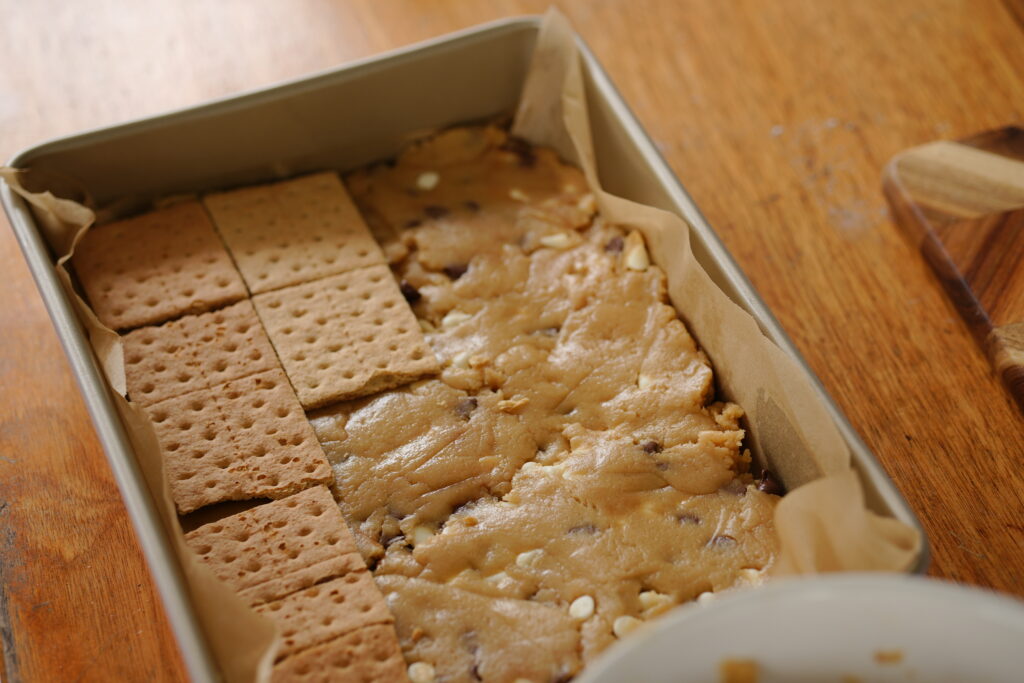
Step 6: Press in the base
Press about two-thirds of the dough evenly into the prepared pan. (Tip: Lightly damp hands or an offset spatula make this easy. If the dough is sticky, chill the pan 10 minutes.)
Step 7: Add the graham layer
Arrange graham crackers in a single, snug layer over the dough.
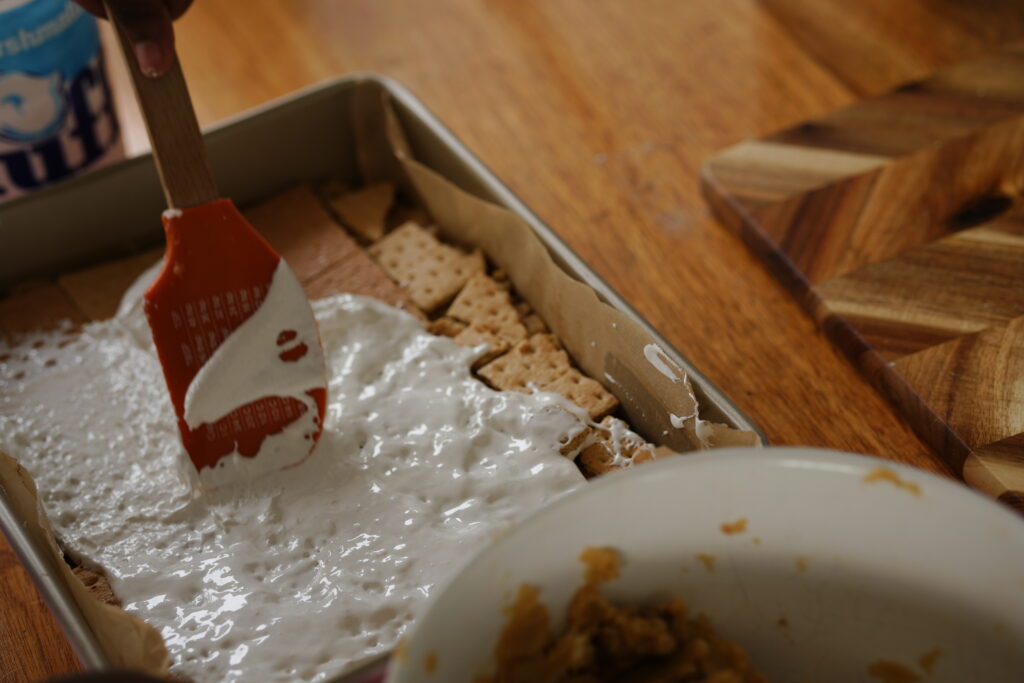
Step 8: Spread the marshmallow layer
Gently spread a layer of marshmallow fluff/creme over the grahams, leaving a small ¼-inch border so it doesn’t ooze out. Spray your spatula with nonstick spray or rub with a little oil so the fluff won’t stick.
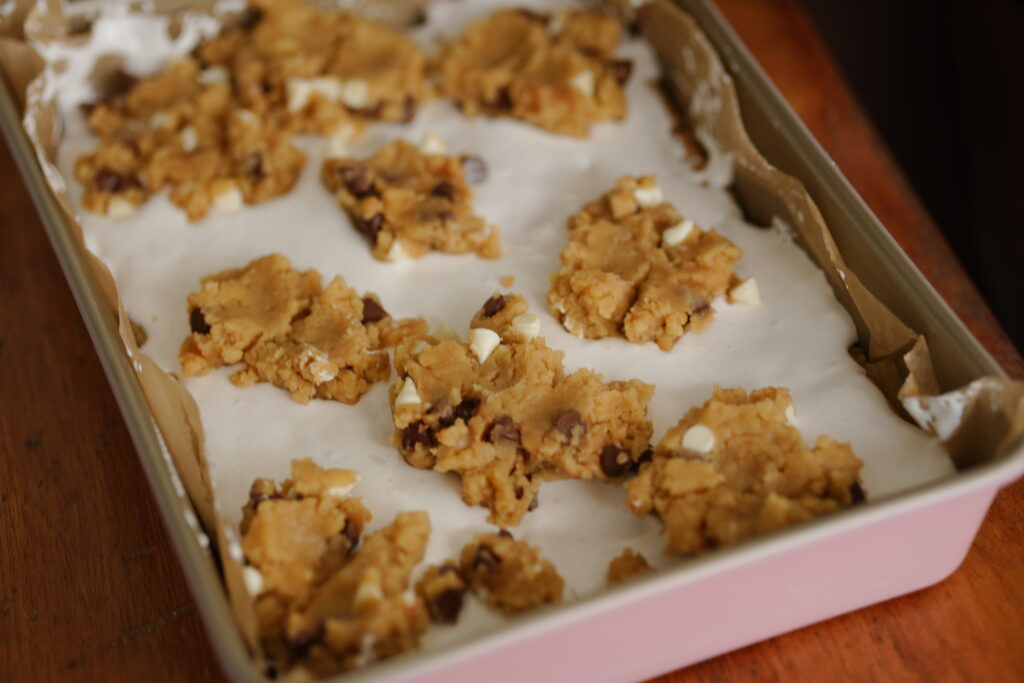
Step 9: Top with the remaining dough
Pinch off pieces of the remaining dough, flatten slightly, and scatter over the fluff. You want a cobblestone look—little gaps are perfect for gooey marshmallow pockets.
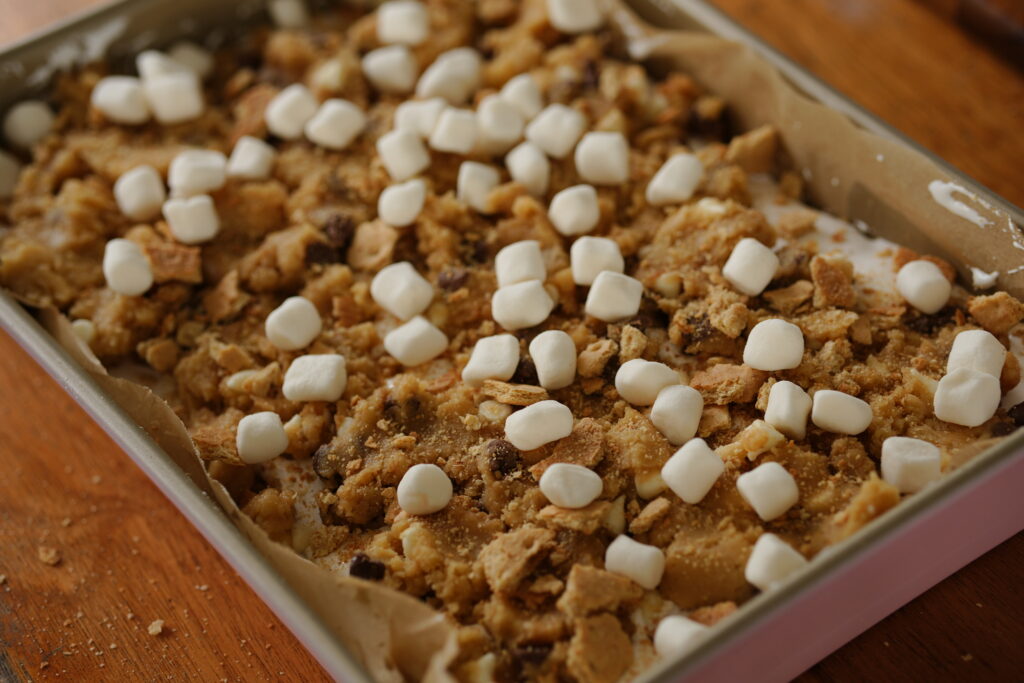
Step 10: Finish with toppings
Sprinkle broken graham bits, pieces of milk chocolate bar, and mini marshmallows over the top. Lightly press so they adhere.
Step 11: Bake
Bake 25–32 minutes, until the edges are deep golden and the center is set but still soft.
- If the top is browning too fast, tent with foil at the 20-minute mark.
- For toastier marshmallows, broil 30–60 seconds at the end—watch closely.
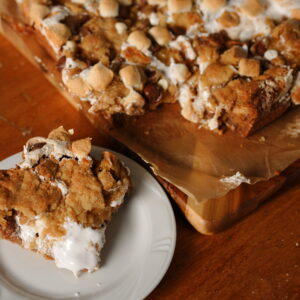
Step 12: Cool & slice
Cool in the pan at least 30–45 minutes for gooey squares. For clean, bakery-style slices, chill 1–2 hours, then lift out by the parchment and cut into 12–20 bars. Rewarm individual bars 10–15 seconds in the microwave for that just-made s’mores vibe.
Quick Success Tips
- Don’t overmix the dough once the flour goes in—overworking = tougher bars.
- Spread the fluff gently. Oiled spatula = no drag, no tearing.
- Chill to slice neatly. A warm, clean knife (wipe between cuts) gives sharp edges.
S’mores Cookie Bars
Ingredients
For the Cookie Dough:
- 1 ½ cups dark brown sugar
- ½ cup white sugar
- 1 cup melted butter
- 2 large eggs
- 2 tsp pure vanilla extract I recommend Watkins Vanilla Extract
- 2 tbsp milk any kind
- 3 cups all-purpose flour
- ¾ tsp salt
- ¾ tsp baking soda
- ½ tsp baking powder
- 1 tsp cornstarch I use Argo Cornstarch
- ¼ tsp cinnamon or ½ tsp if you love more spice
- 1-2 cups chocolate chips I like half milk chocolate, half white chocolate
For the Layers:
- Graham crackers about 1 sleeve
- 1 jar marshmallow fluff or marshmallow creme
- Mini marshmallows for topping or swap with jumbo marshmallows, 1 per bar
- Hershey’s “mini kisses” are classic but any brand of chocolate chips works)
Instructions
- Preheat oven to 350°F (175°C). Line a 13×9 pan with parchment paper and lightly grease.
- Mix sugars & butter. In a large bowl, combine melted butter, brown sugar, and white sugar until smooth.
- Add wet ingredients. Beat in eggs, vanilla, and milk until smooth.
- Whisk dry ingredients. In another bowl, whisk together flour, salt, baking soda, baking powder, cornstarch, and cinnamon. Add to wet mixture and stir just until combined.
- Fold in chocolate chips. Stir in 1–2 cups chocolate chips (I use half milk chocolate and half white chocolate).
- Create the base. Press about two-thirds of the dough evenly into the bottom of the pan.
- Add graham cracker layer. Arrange graham crackers in a single, snug layer over the dough.
- Spread marshmallow fluff. Gently spread marshmallow fluff over the grahams, leaving a small border to prevent overflow.
- Top with dough. Pinch off small pieces of remaining dough and scatter over the fluff, leaving some gaps.
- Finish with toppings. Sprinkle extra chocolate chunks, graham cracker pieces, and marshmallows on top.
- Bake. Bake 25–32 minutes, until golden brown and set in the center. If marshmallows brown too quickly, tent with foil.
- Cool & slice. Cool at least 30–45 minutes before slicing. For clean cuts, chill 1–2 hours, then slice with a warm knife.
Video
Notes
- Swap chocolate chips: Try peanut butter, caramel, or butterscotch chips for fun flavor twists.
- White chocolate variation: Use half milk chocolate and half white chocolate chips for extra gooey richness.
- Slice tip: Wipe the knife between cuts for bakery-style edges.
- Storage: Keep leftovers in an airtight container at room temp for 2–3 days or refrigerate up to 5 days. Freeze up to 2 months.
FAQ – S’mores Cookie Bars
Can I make S’mores Cookie Bars ahead of time?
Yes! These bars actually taste even better the next day once the flavors settle. Bake, cool, and store in an airtight container until ready to serve.
No more juggling cling wrap or flimsy foil—this OXO silicone lid makes storing and transporting baked goods simple. Designed specifically for 9×13 pans, it creates a secure seal while keeping your treats fresh.
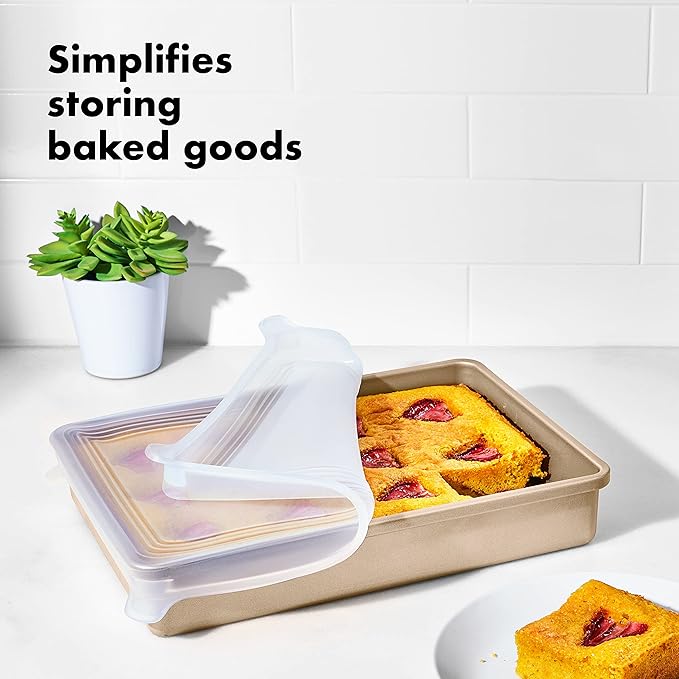
They’re:
- Reusable & Eco-Friendly – Replaces single-use plastic wrap and foil.
- Tight-Sealing – Silicone edge grips firmly for a spill-resistant hold.
- Stackable & Sturdy – Strong enough to place other food containers on top without crushing your baked goods.
- Perfect Fit – Sized for 9×13 Metal Bakeware.
- Multi-Purpose – Great for chilling, storing, or transporting bars, cakes, and casseroles.
Can I use marshmallows instead of marshmallow fluff?
Absolutely. Mini marshmallows work best since they melt evenly, but jumbo marshmallows cut in half also work. Fluff just gives a more consistent gooey layer.
Do I have to use graham crackers?
Graham crackers are classic, but you can swap in digestive biscuits, chocolate grahams, or even cinnamon cookies such as Biscoff for a twist.
Can I make S’mores Cookie Bars gluten-free?
Yes! Swap the all-purpose flour for a 1:1 gluten-free blend and use certified gluten-free graham crackers. Everything else in the recipe should be naturally gluten-free.
Why are my bars too gooey or underbaked in the middle?
They may just need a few more minutes in the oven. Check at the 25-minute mark, but let them bake until the center is set. Remember, they’ll firm up as they cool.
Storage & Leftovers
Room Temperature: Store in an airtight container at room temp for 2–3 days. Great for bake sales, lunchboxes, or after-school snacks.
Refrigerator: Keep in the fridge for up to 5 days. They’ll be firmer chilled, so warm slices in the microwave for 10–15 seconds before serving to bring back the gooey texture.
Freezer: Freeze cooled bars for up to 2 months. Wrap individual squares in plastic wrap and place them in a freezer-safe bag or container. Thaw at room temperature or warm briefly in the microwave.
Make-Ahead Tip: You can also freeze the raw dough in a sealed container for up to 3 months. Just thaw in the fridge overnight, then assemble and bake as directed.
Final Thoughts
There’s just something about s’mores that makes everyone smile—and these S’mores Cookie Bars capture all that campfire magic in a single bite. With gooey marshmallows, melty chocolate, and a buttery graham cracker cookie base, they’re the kind of dessert that disappears quickly (so you may want to make two batches!).
Whether you’re baking them for a party, a family movie night, or just because you deserve something sweet, these bars are sure to become a new favorite. Don’t forget—you can also mix it up with milk chocolate, dark chocolate, or even add white chocolate chips to make them your own.
Happy baking! 🍫🔥🍪
📌 Affiliate Link Disclaimer
This post may contain affiliate links. That means if you click through and make a purchase, I may earn a small commission at no extra cost to you. I only share products I personally use and love, and your support helps keep new recipes coming your way. Thank you! 💛